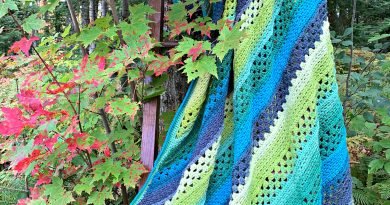
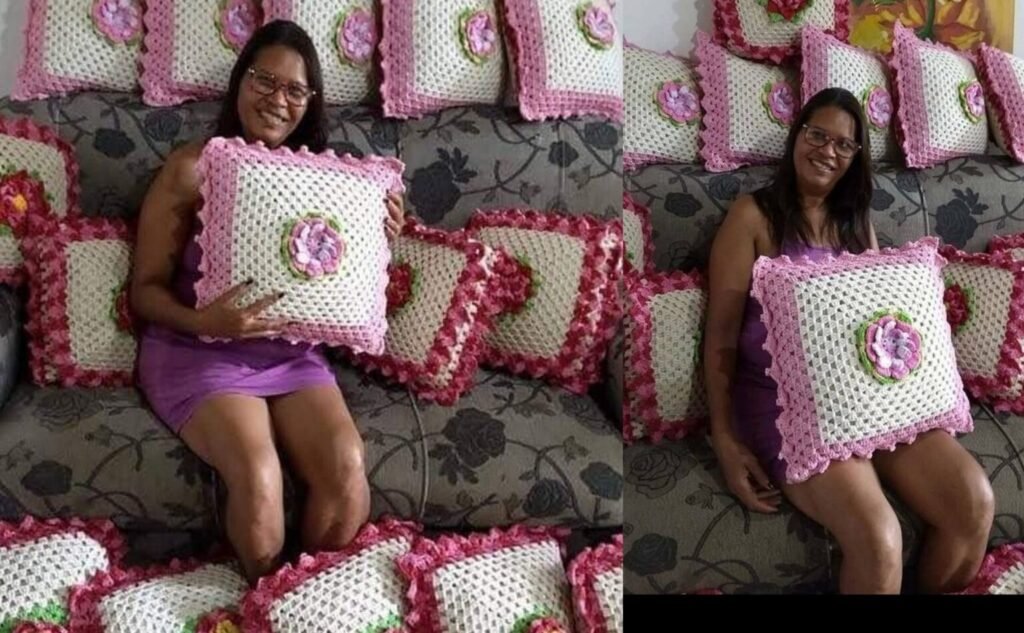
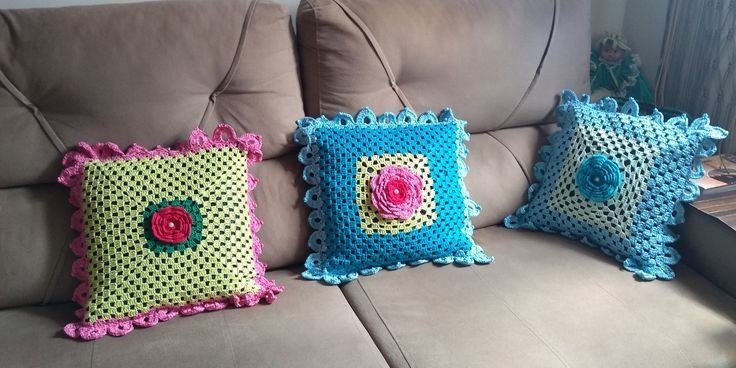
Crochet Cushion Cover
Crochet Cushion Cover is a delicate and versatile crochet work that has a very beautiful and stylish final result for you. When it comes to decorating the room, you need to pay attention to detail and this pillow cover allows you to give a touch of class and elegance to the room where it will be used, whatever is great and will certainly be of great help to you, believe me. This item has a very important role and manages to give harmony to the house.
They must be chosen according to the environment where they will be and must have a defined number of pieces, remember that well. They become a highlight in the decoration and to choose, it is necessary to evaluate the entire environment, which should not be visually charged, this is an important detail.
Many think the cushion just complete the decor when in fact its importance is much greater than just that. They complete and give harmony to the decor, but they must meet the requirements of fabric, print, finish, layout and even padding.
See Also:
➽ Apache Tears Crochet
➽ Crochet Throw Blanket
➽ Crochet Star Stitch
Crochet Cushion Cover
You will need:
220g DK yarn (approx. 30g of each colour )
4 mm hook (US G-6)
Tapestry needle
Stitch markers
Scissors
Cushion 40cm x 40cm (15.75 in x 15.75 in)
Gauge:
17 stitches and 22 rows measure 10 x 10cm (4 x 4in) {single crochet}
Measurements:
40cm x 40cm (15.75 in x 15.75 in)
Abbreviations:
Ch – chain
Sl st – slip stitch
St – stitch
Sc – single crochet – insert hook into next stitch, yarn over pull through stitch, yarn over pull through two loops on your hook.
Dc – double crochet – yarn over, insert hook into next stitch, yarn over pull through stitch, yarn over pull through two loops, yarn over pull through two loops.
Rsc – reverse single crochet {aka – crab stitch} like a single crochet only worked left to right. Insert hook into stitch to the right, yarn over, pull through stitch, yarn over pull through two loops on your hook.
Ok lets start!
Front – Granny Colour Sequence – Fondant, Cream, Pistachio, Light Blue, Lipstick, Light Pink, Lemon, Light Blue, Fondant, Pistachio, Light Pink, Cream, Lipstick, Fondant, Light Blue, Light Pink, Fondant, Pistachio.
Round 1: {granny square}
Ch 4, sl st to 1st ch to form a ring.
Ch 3, 2 dc into ring
Ch 3, 3 dc into ring
Ch 3, 3 dc into ring
Ch 3, 3 dc into ring
Ch 3, sl st to top of 1st ch 3 to join, fasten off yarn. {4 sets of 3 dc in the ring}
Round 2:
Insert hook into ch 3 space that you finished with, sl st to join.
Ch 3, 2 dc, ch 3, 3 dc into same corner space.
Ch 1, 3 dc, ch 3, 3 dc into next corner space.
Ch 1, 3 dc, ch 3, 3 dc into next corner space.
Ch 1, 3 dc, ch 3, 3 dc into next corner space.
Ch 1, sl st to top of 1st ch 3 to join, fasten off yarn.
Round 3:
Insert hook into ch 3 space that you finished with, sl st to join,
Ch 3, 2 dc, Ch 3, 3 dc into same corner space.
Ch 1, 3 dc into ch 1 space.
Ch 1, 3 dc, ch 3, 3 dc into next corner space.
Ch 1, 3 dc into ch 1 space.
Ch 1, 3 dc, ch 3, 3 dc into next corner space.
Ch 1, 3 dc into ch 1 space.
Ch 1, 3 dc, ch 3, 3 dc into next corner space.
Ch 1, 3 dc into ch 1 space.
Ch 1, sl st to top of 1st ch 3 to join, fasten off yarn.
Repeat row 3 {3 dc in each ch space & 3 dc, ch 3, 3 dc in each corner space} until your square has a total of 18 rounds
The back is made from two pieces, one small & one large, that overlap & are fastened by buttons.
Back – Stripes {small piece}
Colour sequence – Fondant, Light Blue, Cream, Pistachio, Lipstick, Light Pink, Light Blue, Fondant, Lemon, Pistachio, Light Pink, Cream, Lipstick.
Ch 71
Row 1:
Sc in 2nd loop from the hook, sc across. (I personally like to go into the 2nd back bump, see my Tunisian Colour Block Scarf post, for reasons why I like it and how to find it)
Row 2:
Ch 1, sc across until last stitch, change colour, fasten off old colour.
Row 3:
Ch 1, sc across.
Row 4:
Ch 1, sc across until last stitch, change colour, fasten off old colour.
Repeat rows 3 & 4 until you have 26 rows in total, the next row you will make the button holes.
Button holes {skipped stitches may be smaller or bigger depending on button size, space evenly}
Row 27: Light Blue
Ch 1, sc across.
Row 28:
Ch 1, sc in nxt 18 sts,
skip 2, ch 2,
sc in nxt 14 sts,
skip 3, ch 3,
sc in nxt 14 sts,
skip 2, ch 2,
sc in nxt 17 sts.
Edge: Fondant
Row 1: {5 stitch repeat}
Ch 1, * sc, dc, dc, dc, sc, repeat from *
Row 2:
Ch 1, * sc in nxt 2 sts, (sc, ch 2, sc in same st), sc in nxt 2 sts, repeat from * fasten off.
Now for the larger piece, this is simply single crochet all the way! easy!
Back – Stripes {large piece}
Colour Sequence – Light Blue, Light Pink, Pistachio, Fondant, Lipstick, Cream, Pistachio, Fondant, Lemon, Light Blue, Lipstick, Light Pink, Light Blue, Light Pink, Fondant, Pistachio, Lemon, Fondant, Cream, Lipstick, Light Pink, Light Blue, Fondant, Pistachio, Cream, Light Pink, Pistachio, Light Blue, Fondant, Lemon, Cream, Lipstick, Light Pink.
Ch 71
Row 1:
Sc in 2nd loop from the hook, sc across. (or 2nd back bump)
Row 2:
Ch 1, sc across until last stitch, change colour, fasten off old colour
Row 3:
Ch 1, sc across.
Row 4:
Ch 1, sc across until last stitch, change colour, fasten off old colour.
Repeat rows 3 & 4 until you have 66 rows in total.
UK Terms
Abbreviations:
Dc – double crochet – insert hook into next stitch, yarn over pull through stitch, yarn over pull through two loops on your hook.
Tr – treble crochet – yarn over, insert hook into next stitch, yarn over pull through stitch, yarn over pull through two loops, yarn over pull through two loops.
Rdc – reverse double crochet {aka – crab stitch} like a single crochet only worked left to right. Insert hook into stitch to the right, yarn over, pull through stitch, yarn over pull through two loops on your hook.
Front – Granny Colour Sequence – Fondant, Cream, Pistachio, Light Blue, Lipstick, Light Pink, Lemon, Light Blue, Fondant, Pistachio, Light Pink, Cream, Lipstick, Fondant, Light Blue, Light Pink, Fondant, Pistachio.
Round 1:
Ch 4, sl st to 1st ch to form a ring.
Ch 3, 2 tr into ring
Ch
3, 3 tr into ring
Ch 3, 3 tr into ring
Ch 3, 3 tr into ring
Ch 3, sl st to top of 1st ch 3 to join, fasten off yarn. {4 sets of 3 tr in the ring}
Round 2:
Insert hook into ch 3 space that you finished with, sl st to join.
Ch 3, 2 tr, Ch 3, 3 tr into same corner space.
Ch 1 3 tr, ch 3, 3 tr into next corner space.
Ch 1 3 tr, ch 3, 3 tr into next corner space.
Ch 1 3 tr, ch 3, 3 tr into next corner space.
Ch 1, sl st to top of 1st ch 3 to join, fasten off yarn.
Round 3:
Insert hook into ch 3 space that you finished with, sl st to join,
Ch 3, 2 tr, Ch 3, 3 tr into same corner space.
Ch 1, 3 tr into ch 1 space.
Ch 1, 3 tr, ch 3, 3 tr into next corner space.
Ch 1, 3 tr into ch 1 space.
Ch 1, 3 tr, ch 3, 3 tr into next corner space.
Ch 1, 3 tr into ch 1 space.
Ch 1, 3 tr, ch 3, 3 tr into next corner space.
Ch 1, 3 tr into ch 1 space.
Ch 1, sl st to top of 1st ch 3 to join, fasten off yarn.
Repeat row 3 {3 tr in each ch space & 3 tr, ch 3, 3 tr in each corner space} until your square has a total of 18 rounds
Back – Stripes {small piece}
Colour sequence – Fondant, Light Blue, Cream, Pistachio, Lipstick, Light Pink, Light Blue, Fondant, Lemon, Pistachio, Light Pink, Cream, Lipstick.
Ch 71
Row 1:
Dc in 2nd loop from the hook, dc across. (I personally like to go into the 2nd back bump, see my Tunisian Colour Block Scarf post where I show you)
Row 2:
Ch 1, dc across until last stitch, change colour, fasten off old colour.
Row 3:
Ch 1, dc across.
Row 4:
Ch 1, dc across until last stitch, change colour, fasten off old colour.
Repeat rows 3 & 4 until you have 26 rows in total.
Button holes {skipped stitches may be smaller or bigger depending on button size, space evenly}
Row 27: Light Blue
Ch 1, dc across.
Row 28:
Ch 1, dc in nxt 18 sts,
skip 2, ch 2,
dc in nxt 14 sts,
skip 3, ch 3,
dc in nxt 14 sts,
skip 2, ch 2,
dc in nxt 17 sts.
Edge: Fondant
Row 1: {5 stitch repeat}
Ch 1, * dc, tr, tr, tr, dc, repeat from *
Row 2:
Ch 1, * dc in nxt 2 sts, (dc, ch 2, dc in same st), dc in nxt 2 sts, repeat from * fasten off.
Back – Stripes {large piece}
Colour Sequence – Light Blue, Light Pink, Pistachio, Fondant, Lipstick, Cream, Pistachio, Fondant, Lemon, Light Blue, Lipstick, Light Pink, Light Blue, Light Pink, Fondant, Pistachio, Lemon, Fondant, Cream, Lipstick, Light Pink, Light Blue, Fondant, Pistachio, Cream, Light Pink, Pistachio, Light Blue, Fondant, Lemon, Cream, Lipstick, Light Pink.
Ch 71
Row 1:
dc in 2nd loop from the hook, dc across. (or 2nd back bump)
Row 2:
Ch 1, dc across until last stitch, change colour, fasten off old colour
Row 3:
Ch 1, dc across.
Row 4:
Ch 1, dc across until last stitch, change colour, fasten off old colour.
Repeat rows 3 & 4 until you have 66 rows in total.
Cushion Construction
First…..weave in ends & block your pieces. Lay your granny square face down, large piece on top towards the bottom & the small piece on top, towards the top, over lapping the large piece. Hold together with stitch markers.
Our Team’s Opinion About This Pattern
Crochet Cushion Cover, a beautiful pillow cover to give your pillow a new and stylish look!! I’m sure you’re gonna love the look this piece will provide you on the decor, believe me, you’re gonna love it. This is a piece that is always needed, that’s why it is so famous and required. This piece will surely make your customers want one like it, which will help you in sales!!
Want to make this amazing Crochet Cushion Cover? Then set aside all your material and tools before starting your piece so that you already have everything close at hand, this way it’ll be easy to carry out this project, follow the tutorial carefully, make your piece while following the tutorial and I’ m sure that you will be able to make this amazing work easily.