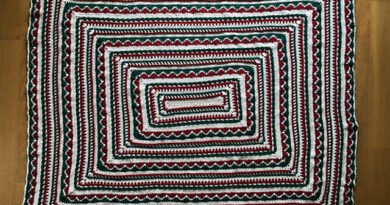
Crochet Oval Doily Rug
Crochet Oval Doily Rug is a very old craft technique, but every day it is acquiring new shapes, techniques and threads, which has brought us many more possibilities. Artisans that have been surprising, with new ideas creations. Take the opportunity to improve this technique and you will feel able to produce beautiful shapes, just let your imagination flow. There are some elements that must be taken into consideration when choosing a rug are the room where it will decorate and the furniture that integrates the composition, remember that well.
With few materials and following the tutorial carefully, you can make this beautiful piece in crochet and the colors can be chosen according to what best matches your decor, which can help you a lot. This rug looks good in any room in the house and makes the room beautiful and cozy.
A beautiful job that is very well explained in this tutorial shared here. With attention, you can make this beautiful crochet piece to leave your home well decorated and very charming. The art of crochet has been providing a multitude of novelties and options with innumerable creativity.

See Also:
➽ Thread Crochet Shawl Pattern
➽ Circle In Crochet Blanket
➽ Crochet Hexagon Blanket Beehive
Doily Rug Oval Crochet
MATERIALS
Yarn 6 (800g)
Crochet Needle 3.0mm
Dimension: 96 x 70
Round1 – Begin by creating with 5 chains, go back to the fourth chain and make 5 high points, see that counting on the other 3 chains then formed a set with 6 high points.
Round 2 – Now make 1 high point on each chain until you reach the last chain and again make 6 high points together to make the turn.
Round 3 – Enjoy to return tying twine and make the finish … Finalize the turn with low point. Thus at the end we will have a total of 102 high points being 90 in length counting the 2 sides and in each part rounded 6 high points.
Round 4 – To start the second round, make two chains and make 1 more high point in the same base point, in the next 5 high points make 2 high points together, then totaling 12 high points in 6 base points.
Round 5 – Make two streams of space and without jumping base point make a high point but without finalizing the second phase of the point, see that I went only once and left in the needle, then we will do 2 more points to total 3 and finalize everything together . Note that they are not points together but 1 in each base point but finalized together …
Pass all together and finish with a low point.
Round 6 – After finishing with very low point make a current of space and again repeat the 3 high points finalized together, I want to remember that it is a point in each base point and finalized together .. When completing 15 sets we will have then arrived in the rounded part again.
Round 7 – Make two streams of space and again 2 high points together at each base point for 6 times, again two streams of space and go back on the other side repeated the same as was done in the previous, 3 high points finalized together. Finish the lap with a low point.
Round 8 – Start the 3 lap with two chains and then make 2 high points in the same base point, but this time make it equal on the side of the carpet, only the first phase of each point and finalize them together with the two Currents.
Round 9 – Make 3 streams of space, without jumping base point again execute 3 high points finalized all together. See that it makes 1 high point at 1 base point and then 2 high points together at the same base point … follow the whole curve of the carpet always with 3 streams of space.
Round 10 – When doing the 6th set of points make 3 streams of space again and then a set with 3 high points together in the first space of the side, to follow to the next space make only two streams of space. Follow all the side of the carpet and when doing the last joint in the space of the lateral make again 3 currents of space and repeat the previous procedure to make the curve of the carpet.
Note that when you get back on the curve make 3 chains and then 1 set with 3 high points, do not forget to make 1 high point on the first base point and 2 high points together on the second base point … go all the way around and Finish with a very low point at the top of the first set of points that started this lap.
Round 11 – 4th lap – After finishing with a very low point, make 1 low point inside the first space and then make 4 chains. Make 1 point act within the same space, then a current of space and another 1 point high. Note that the 5 chains will also form 1 high point.
Round 12 – Without making a space current, go to the next loop and make 1 high point, a current of space, 1 high point, again a current of space and the third high point. I pointed out with the needle that the first space before the beginning of the turn has 3 streams of space, when we get there we will make this start, the sides of the carpet are different and do not forget to make this observation so that the carpet is not crooked.
Continue to always do a set of 3 high points on the handles that have 3 chains, see that we have in total 6 pins and when we complete the turn we will make a further set of 3 points in the same handle and we will have 7 sets of 3 points in the same handle forming The rounded part of the carpet.
Round 13 – After making the 6th set with 3 high points, we have the front one handle with only two chains where already starts the side of the carpet, without making a space current make 1 high point, a chain and 1 high point in the same handle, or A set with only 2 high points. Follow all the side and when arriving in the rounded part (where we will have 3 chains again) make a joint with 3 high points.
Round 14 -See that in the rounded part we are going to repeat the previous step … We will then have 7 sets with 3 high points. On the next side repeat the steps on the other side.
15 – See that the last handle has 3 chains and then we will make a set with 3 high points and finishes the back with very low point in the third chain of the 4 that started the return, of this form we will have the current forming 1 high point and a current of space .
16 – 5th turn – After finishing with a very low point, make
1 low point in the space of a chain and then make 4 chains. Make a high point on top of the middle point (of the group with 3 points on the previous turn) A space current and 1 high point on the same base point, a space current and 1 high point on the second space of a chain,
17 – Then make a current of space and make 1 high point in the first space of the second group, again without space current make high point above the high point of the middle, a current and another high point in the same base point, A current of space make 1 high point in the second space. Follow this way throughout the rounded part of the carpet.
18 – When arriving at the side of the carpet make only a current of space and do exactly as in the previous lap, 1 high point, a current of space and 1 high point, to pass to the next space do not make current. Continue until you reach the oval part of the carpet and repeat the previous steps. Finish the lap with a low point at the top of the third chain that started the turn.
19 – 6th lap – After finishing the previous lap, make 1 low point in the first space of a chain, see that I am counting the 3 starting currents of the previous lap as the first point. Make 3 chains and then make 1 high point within the space of a chain, make a current of space and 1 high point in the same space, make a current of space make 1 high point in the next space of a chain.
20 – Without making a current of space, make 1 high point between a group and another of the previous lap.
21 – Then make 1 high point within the space of a chain, make a current of space and 1 high point in the next space, a current and 1 high point in the same space, make a current of space make 1 high point in the next Space of a chain. Continue repeating this way across the rounded part of the carpet.
22 – When you reach the side, make a current of space and repeat as in the previous turns (1 high point, a current and 1 high point in the same space, go to the next space without making a separation current)
23 – When you reach the rounded part again repeat the previous steps … do all round and finish with very low point at the top of the second chain that started this turn.
24 – 7th round – After previous, make 3 chains and then skip 1 base point and lock with low on the first space of a previous lap current.
25 – Again 3 streams of space, skip 1 base point and trap low over the fourth high point of the same little group,
26 – Then make 3 chains, skip the high point that divides the small groups and attach to the first high point of the next group. Now just repeat the previous steps across the rounded part of the rug. See that it will end on top of the last high point of the little group that forms the oval part …
27 – Then make 3 chains and attach with low in the first space of a chain on the side of the carpet, 3 chains again and fasten in the second space … follow this way all the way, in the next oval part do as the previous one, It returns with a very low point on the same point that started this turn.
28 – 8th lap – After finishing with a very low point, make one more low point on the first chain that forms the first handle, then make 1 low point inside the handle.
29 – Now let’s repeat, 3 chains and attach with low on the next handle … again 3 chains and attach with low on the next handle … go all the way around and finish with the lowest point on the low starting point of this turn.
30 – 9th round – After finishing with a very low point, make 1 low point inside the first handle and then make 3 chains and 4 more high points, remove the needle, insert in the third chain, lace the string and pull, then do 1 very low point then forming 1 popcorn point.
31 – Make two streams of space and in the next space make another popcorn point, (5 points high, remove the needle and insert in the top of the first point and pull, then make point very low) Follow all around always with two chains of space. Finish the turn with the lowest point on top of the first popcorn point.
32 – 10th lap – Start lap with low inside the first handle, make two chains and two more high points. Make a current of space and in the next handle again a notepad with 3 high points … follow this way in the oval part of the carpet.
33 – When you get to the side, (after 16 small groups) See that it has finished exactly in the handle that divides the oval part of the side of the carpet.
34 – Now do not make a current of space, go to the next handle and make 1 small group with 3 high points, in the next loop again 3 high points … no space current, all closed, if you make space current will form ruffles.
35 – After 16 small groups we come back in the oval part, make a current of space and work groups always with current of space … After 20 small groups with currents of space arrives again in the lateral …
See that after 16 small groups with no space did not complete the return yet, make groups with chain t
o complete the return because we start in the oval part, complete the oval so that it also has 20 groups with currents of space. Finish the lap with a low point.
36 – 11th turn – Make low in the first space and again the turn equal to the previous one … where there is space make the current space, on the side of the carpet make blocks from the previous blocks, see that there is no current of space but this does not Get in the way … go all the way around and finish with a very low point.
37 – 12th lap, we will make a single change, see that after starting the turn make 4 blocks and then make two streams of space, then continue with only the current of space for another 11 blocks, on the side of not make space between the blocks As in previous rounds.
38 – When you reach the other oval part of the carpet, make the two space streams after the 11th pad … then continue normally, complete the lap, do not forget that after the side we will again have spaces between the pads, finish with a very low point.
39 – 13th lap – This loop is equal to the previous one, just after the two space currents again make two streams of space. Complete the lap and finish with a low point.
40 – 14th lap – After finishing the previous lap, make a current of space, let’s make a complete lap with low. After the current, go down with only one wire from each high point, look at the images … in the space currents make too low … on the side of the carpet we do not have space currents and then we will make 1 low point for each base point. In total we will have 260 points counting with the current start, Finalize the return with very low point in this chain that forms the first point.
41 – After finishing the turn, removes the needle and insert from back to front, we will pass the handle to the back of the carpet to work the next turn. If you want, you can also cut the thread and cast it with a needle for a better result. If you want to see how to cast off see the step by step of the rolled Rose, watch how the tail of the flower is made, so it is a perfect finish. If you choose this firing start the next turn holding the string at the same low point only on the back wire … otherwise just proceed with the step by step.
42 – 15th lap – After passing the string to the wrong side, make a chain and again we will work a lap with low points (it can also be half a high point) This time we will only get the wire from the back of the 13th lap, On the 14th lap we made the points on the front wire, this time we will continue the carpet on the back wire, so the 14th lap will be loose forming a relief detailing our carpet! From all the way around, there are no increases, one point for each base point totaling 260 points. Finish the turn with very low point in the initial current that forms the first point.
43 – 16th and 17th laps – Again make a chain to start the turn and then work again a whole loop with low points, this time taking only the wire from the back of the previous lap so that the wire in the front forming a very beautiful detail On the rug. Do it all the way around. It is normal to be pulling a little, after the next 3 laps it will be normal. If you keep pulling, make sure your point is not too tight!
44 – 18th lap – After finishing the previous lap, make a current of space and then do 5 more low points, this time take the two wires normally … then do 15 chains, skip 4 base points and fasten with low, Do 5 more points totaling 6 points counting on what we did to hold the handle …
45 – Again of 15 chains, skip 4 base points and fasten with low, of 5 more lows then completing 6 lows by counting what we hold the 15 chains handle …. Go all the way around, if you did the previous laps properly you should finish the lace by attaching a handle to the starting current, in leftovers or missing points. We will have a total of 26 handles with 15 chains.
46 – 19th lap – After finishing with a very low point, make one more low point on the next low point and then do 2 low points, thus leaving 1 low empty spot before reaching the handle and more what holds the handle.
47 – On the 15-string handle work 21 high points, skip the first low low and hold low, make 1 more low, and work on the next loop again … do all round and end with low point at low Starts the turn.
48 – 20th lap – Walk low to the third high point of the 21 on the handle, then make low points on the 4th, 5th and 6th high points. Make 3 chains, skip a base point and fasten with low.
49 – Then make 3 chains again, skip 1 base point and fasten with low … follow until completing 5 loops with 3 chains, after attaching the 5th handle make 2 more points low, see that there are 3 higher points …
50 – Make a current of space, skip 3 base points of the next fan and hold low, do 2 more lows and then again the 5-handle sequence … go all the way around and finish with low point.
51 – 21st lap – After finishing lap, follow with low point at the
next low points and then make 1 low point inside the first handle. Make 3 chains and 4 more high points, remove the needle and insert in the third chain, lace and pull the string, then fasten with very low point forming 1 point popcorn.
52 – Make two streams of space and in the next wing make another point popcorn … do in the 5 loops of this first fan.
53 – To pass to the next handle, after attaching the popcorn point make only a current of space, then work popcorn points always with two streams of space … go all around and finish with very low point in the initial popcorn point.
54 – 22nd lap – After finishing with the lowest point, make 4 points on the first handle. In the second handle do 3 low points, in the third handle do only 4 low points and in the fourth handle do 3 low points.
55 – To pass to the next fan, between a popcorn point and another has only one chain, in this chain we will do nothing. Without running space go to the first handle and make 4 points low, the second handle 3 points low, the third handle 4 points low and the fourth handle 3 points low. Did you see that it always goes in? Follow this way all the way around and finish with a low point in the first low of the 4 that is in the first handle.
56 – 23rd lap – After finishing the previous lap Go to the second point and make the low point, keep making low until just about 2 in this range. See that they are in all 10 lows.
- Make 5 space streams, skip the 2 low points of this fan and the first 2 of the next fan, attach with low on the third base low point, do 9 more points low and again a handle with 5 chains. Click on the images to enlarge and understand better … Go all the way around and finish with a very low point above the first low point that starts this turn.
59 – 24th lap – After finishing the previous lap make 1 more low point, then do 6 low points, this way there will be 1 low base low and the second starting the handle.
60 – Then make 10 high points on the handle with 5 chains, skip 1 base point and hold low, note that I do not count the point that is holding the handle, we have to skip an empty base point. Then do another 5 points. Again work 10 high points on the handle with 5 chains … go all the way around and finish with the lowest point on the first low point that starts this turn.
61 – 25th lap – After finishing the previous lap, make 1 more low point and then do 2 low points, see that there are 2 low base points left.
62 – Make a current of space and let’s make triple high point in low relief. Wrap the string 3 times on the needle and then pass the needle from below the top as shown in the third image … then make the triple high point and a stream of space.
63 – After the current of space, make triple point in low relief taking the second high point … make a current of space and again triple high point … follow until completing the 10 points, make a current of space and attach with low in the Second base point, make 1 more point low. It is normal that the last triple high point is a little shrunk, the next time it will get normal.
64 – After the second low point, make a chain and again work triple high points as in the previous step … go all the way around and finish with a very low point.
65 – 26th lap – After finishing with very low point walk with very low point and make low point inside the first space of a chain that separate 2 triple high points. Do 3 chains of space and attach with low in the next space of a chain … Continue making handles in all the following spaces, we will have in total 8 handles with 3 chains in this range.
66 – Make 3 chains and space and attach with low in the first space of a chain that separate the triple high points of the second fan. See that the point that was shrunk is normalized. Repeat 8 handles with 3 chains, to move to the next fan again 3 chains … go all the way around and finish with a very low point.
67 – 27th and last lap – After finishing with very low point make 2 low points in the first handle with 3 chains. Then make 1 point picot (3 chains and attach with low on the top of the second low point) Then go to the second handle and make 2 low points.
68 – After the 2 low points do picot point again and go to the third handle and do 2 low points, again picot point and go to the fourth handle and make 2 low points. Then do 5 chains and attach with low on the top of the second low point, that is, it is exactly like the picto stitch only with 5 chains.
69 – Go to the next handle and do 2 points low and do 1 point picto, follow until finishing the eighth handle with 2 low points, see that there are 3 points picots with chain, 1 point picto with 5 chains and 3 more points picots with 3 chains.
70 – On the handle with 3 chains that separate the fans make only 1 low point, go to the next fan and repeat the previous steps … go all the way around, finish with low point, cut the wire and finish. Finally rug ready !!!

Our Team’s Opinion About This Pattern
Crochet Oval Doily Rug, a beautiful rug to change the face of your house giving it a new look. I’m sure you’re gonna love this amazing piece, it’s easy to be done and it’s sure to be perfect for you and your house, believe me, it’s gonna make your customers want one like it to use in your house, will help you in sales!!
Want to make this amazing Crochet Oval Doily Rug? So it’s simple, set aside all your material and tools before starting your piece so that you already have everything close at hand, so it will be easy to carry out this project, follow the tutorial carefully, make your piece while following the tutorial and I I am sure that you will be able to make this beautiful project easily.