Whirlwind Quilt Block
This Whirlwind block places a sturdy “Spin” on the Pinwheel, but you should know that the ‘blades’ (or whatever you want to call them) are a little more than half the side of the block, so they do not fit if you put 2 blocks of Slipstream next to each other.
For this reason, I would recommend this block more as part of a quilt sample from a block. But if the sides do not line up perfectly, it will not bother, of course, making a whole Whirlwinds quilt!
When I chose the whirlpool block (because it is so delicious), I realized I could carefully measure and cut the eight pieces it contains, or I could sew first and then cut to make it much faster.
The quickest way to make this block from afar is to sew two strips of WOF (fabric width) and cut them. This will make your job much easier to sew and handle.
To cut your cut and sew the time by more than half, I want you to make two blocks this month.
Or make a block and then ask to make a second block in about a few minutes if you want. If the fabrics are cut and separated, the blocks will be created much more quickly and will be aligned. Soon you will see your project taking shape. Inspire yourself in colors that make you happy.
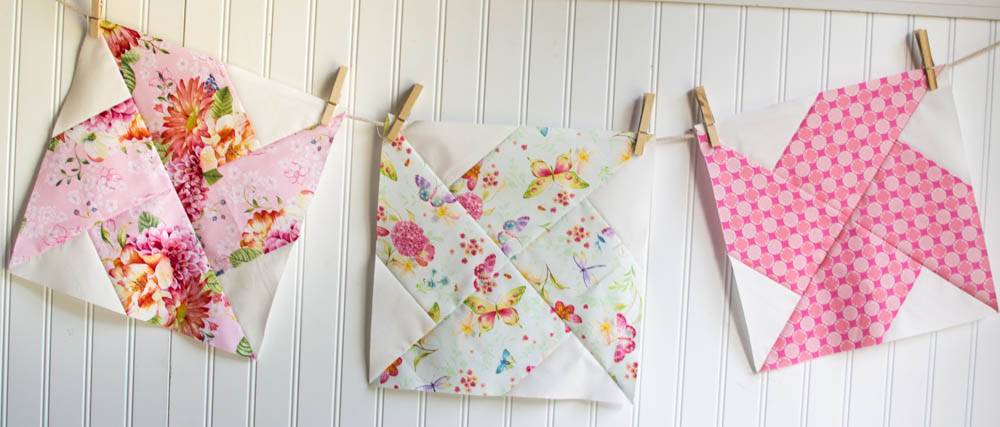
This Whirlwind block puts a sturdy “spin” on the weather vane (quilting pun), but you should know that the “blades” (or what you would like to call them) are a little over half the side of the block, so they do not fit perfectly if you put 2 swirling blocks next to each other.
For that reason, I would recommend this block more as part of a quilt than a quilt from a block. But if the sides do not line up perfectly, that does not bother you, of course, making a whole Whirlwinds quilt!
So to make a 12 ” slipstream block (plus a bonus of 12 ” reversal of Whirlwind color block if you want), cut:
1 5 ” x WOF strip from main web
1 5 ” x WOF strip of bottom tissue
Sew the two strips and press the seam to the darker fabric.
Sub-cut the strip into four 9 1/2 squares.
Then cut each square in half diagonally.
Note: Cut each one in the same direction (as the lower left corner to the upper right corner, as I did above). The direction you cut your squares also determines how the whirlpool rotates.
For best results, use two different color fabrics of similar value, for example, two light fabrics or two medium fabrics.
The quilt has two visual interpretations, depending on whether you focus on the windmill pattern or the negative space of the quilt, which is a form of support.
If you want to have the rest of the pattern, go to the following link and complete this beautiful pattern with no complications.
In pattern free, I include many written information and instructions, traditional templates, foundry template templates, schematics suggestions, and some ways to make it easier and easier for you to complete your new project.
A big thank you to the people who used our site to create their new projects. I hope you enjoy my subject and enjoy doing it.
Whirlwind Quilt Block 

Follow our page on facebook Crochet and Knit Free Patterns, and our Crochet & Knitting Group. We give weekly tips with Free pattern. I’ll see you there. To know more follow us on Pinterest. Browsing Amazon, I found this beautiful pattern on sale, enjoy: Whirlwind Quilt Block.