Hallows Quilt Block
Hello, welcome to Craft Ideas.I bring you a beautiful pattern of block that is known as FOUR PAR STRIP BLOCK. As I have several friends beginning their sewing adventures and quilting drawings, I set the steps below to encourage them and show them how I did it.
This beautiful block All Allows Quilt. In quilting projects there are several ways to get things done and each person will go with the time and experience choosing what works best for them. Feel the way you like it and other people, okay?
It is always good to learn new block models to improve your work and projects, to make the project you want and always leaves for later.
So come on, choose the best fabric and the best colors, your favorites or what to match with your decor and hands down. I leave you a step-by-step PDF with all the instructions needed to make this block and right after a video, no doubt.
Preparing the Pieces and Sewing the Block
First mark and cut the rectangle of Color 15 “x 15” into twelve squares of 2-1 / 2 “.
Now mark and cut the 2/2 “x 10” colored strip into four 2-1 / 2 “squares.
Then mark and cut the 3 4-1 / 2 “x 18” colored strip into four 4-1 / 2 “squares.
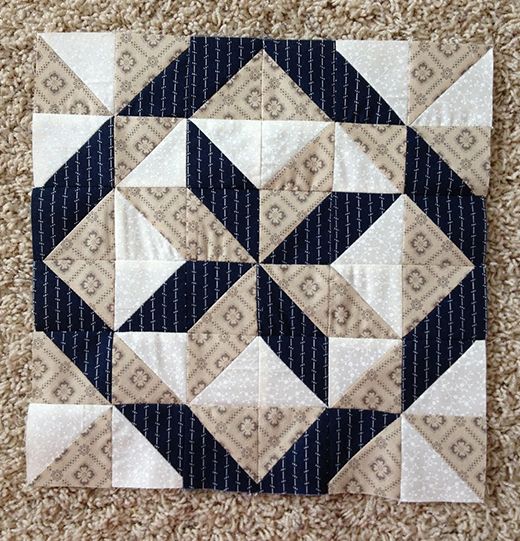
On the next piece of speed, the half piles, stacking Color 3 / Color 1 2-7 / 8 “x 11-1 / 2”, remove the right sides and all ends aligned. At the back of the upper band, lightly mark the 2-7 / 8 “square lines, and then mark the diagonals in the direction shown on the left, seam 1/4” above and below the marked diagonals, rotating on the square lines .
Separate the marked diagonals between the seam lines and the square lines. This will give you 8 semitones of color 3 / color 1.
Repeat the same procedure with a set of 3 / color 2 2-7 / 8 “x 11-1 / 2” color strips to get eight in color combination and one color 1 / Color 2 2-7 / 8 “x 5-3 / 4” track set to get four in this color combination
Now place a 1.2 to 2/2 “color square aligned with the upper left corner of a 4 4-1 / 2” colored square, the right sides together and all the edges aligned. At the back of the small top square draw the diagonal and sew on this marked line. Cut off excess seam.