Flower Motif
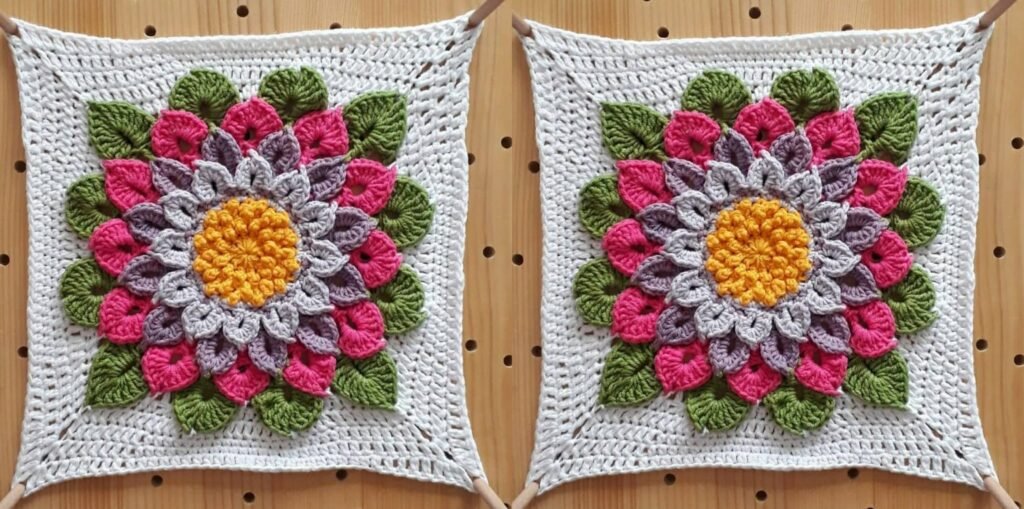
Flower Motif, an amazing and colorful motif that I’m sure will delight you. Taking advantage of the lines you have at home, you can do a colorful job and make the most of your lines and strings, which is great and can help you. With this effect, it really looks like a beautiful flower in the middle of the motif, giving a delicate and cheerful look to the work that in itself is amazing. This recipe is simple and has a very nice result of the motifs you will love.
It’s worth investing in pieces like this to compose your products for sale because they give it a special touch. These pieces with colorful and delicate details draw attention for their beauty and delicacy that everyone loves. This motif can be used in different types of work, for example, a beautiful colored pillow, a centerpiece or a beautiful pot rest, you decide.
Thank you for visiting our website, your presence is very important to us. We always try to bring the best for you so you can enjoy. Did you like the article? Beautiful and stylish, this colorful crochet motif will make the difference in any job you want to do, giving it a touch full of charm and beauty.
See Also:
➽ Crochet 2 Corner Blazers
➽ Crochet Rhombus Blanket
➽ Crochet Square Blanket
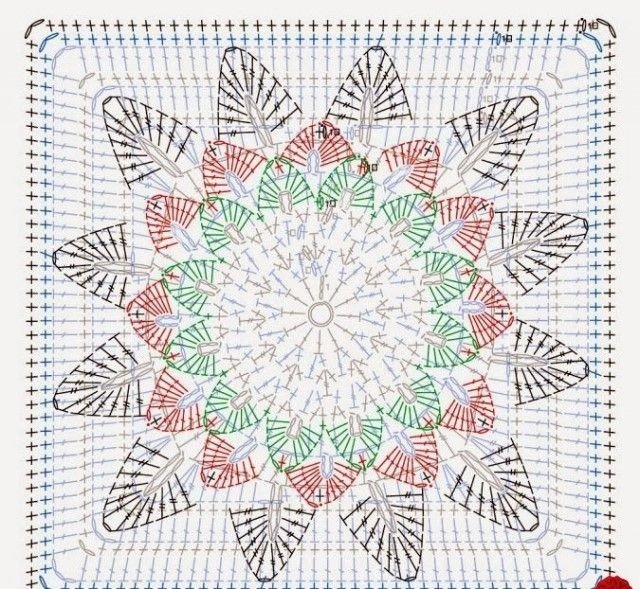
Flower Motif
Rnd 1
Create a magic ring
Rnd 2
Ch 1 and TURN so that the back of Rnd 1 is facing you (straight check). This round (and the next 2) will be worked with the wrong side of the work facing you (straight check).
Place a piece of scrap yarn over your work before making the first st of this round. Make a tr in the same st as the sl st join. You will find this stitch to the right of the stitch marker (left if you are left-handed). Skip the back end of the sl st join and (sc, tr) in the next st. When making the bubble stitches, make sure that the treble pops out away from you.
Repeat around as instructed in the pattern. Join to the first ch with a sl st (straight check).
Rnd 3
In this round you will be working only into the sc’s, not the tr’s!
Ch 1. Place a piece of scrap yarn over your work. (Tr, sc) in the same st as the sl st join. *Skip the next tr. (Sc, tr, sc) in the next sc (straight check).
Join to the initial ch st with a sl st.
Rnd 4
In this round you will again be working only into the sc’s, not the tr’s. To help you identify the trebles, it is useful to know that their top loops will appear slightly larger than the tops of the sc’s. They will also fall directly in front of a bubble stitch.
Ch 1. Place a piece of scrap yarn over your work. Skip the next tr. (Sc, tr) in the next sc. sc in the next sc (Photo 3) 11 times. Join to the initial ch st with a sl st (indicated with an arrow in Photo 5). Fasten off and work away your tails of yarn.
This is what your flower center should look like from the right side. Notice that the bubbles in each round fall between the bubbles of the previous round.
Rnd 5
From this point onwards, you will work with the right side facing you. So turn your center so that the bubbles are all smiling at you, not at your lap.
A last reminder of how to identify the trebles. They should be directly behind each bubble stitch and their top loops will also be slightly larger than those of the sc’s.
Join your yarn by making a standing single crochet in the first sc after any tr around. Sc in the same st. Make 2 sc’s in the next st.
Ch 5 and sl st into the sc at the base of the ch-5, creating a ch-5 loop. Skip the next tr and make 2 sc’s in each of the next 2 sc’s.
Repeat as instructed in the pattern and join to the first sc with a sl st. Fasten off and work away your tails of yarn.
Rnd 6
Join your yarn by making a sl st in the first sc after any ch-5 loop. Ch 4 (counts as first tr)
Fasten off at the end of this round and work away your tails of yarn.
Rnd 7
The initial ch-8 counts as a (tr, ch-4). When joining, remember to join to the fourth ch of the beginning ch-8.
Rnd 8
sl st into the next ch-4 space. Ch 1 and make 4 sc’s in the same ch-4 space.
Sc in the next tr. Ch 2 and hdc in the tr after the ch-6 loop. (2 hdc, 2 dc) in the next ch-4 space. Make 3 tr’s in the next tr. Ch 3 and make 3 tr’s in the tr after the ch-6 loop. (2 dc, 2 hdc) in the next ch-4 space. Hdc in the next tr. Ch 2 and sc in the tr after the ch-6 loop.
Repeat as instructed in the pattern and join to the first sc with a sl st.
Pop the ch-6 loops to the front of your work.
Rnd 9 – 13
These rounds are simple sc and dc rounds.
Rnd 14-18
Work into the ch-4 spaces from Round 7. Each of these ch-4 spaces already have 4 stitches worked into them from Round 8. You will need to insert your hook between the central 2 stitches and around the ch-4 (see Photo 1).
With a slip knot already on your hook, and starting between the central 2 sc’s of Round 8 on any side, insert your hook around the ch-4 from Round 7. Make 6 tr’s into the next ch-6 loop and then ch 1. Flatten the petal and locate the stitch in Round 12 or 13 that lies behind the petal. Insert your hook around the post of that stitch and make a sl st. Ch 1 and make a sc into the side of the last of the 6 tr’s you made into the ch-6 loop.
Now make 6 more tr’s into the same ch-6 loop. Finish the petal by making a sc around the next ch-4 space from Round 7, again inserting your hook between the 2 central stitches (from Round 8) made into the ch-4 space.
Repeat around and join as instructed in the pattern.
When you “tack” down the corner petals, I suggest inserting your hook around the ch-3 space from Round 10, between the 2 corner sc’s from Round 11.
Stitch count: 12 Petals (each containing 12 tr’s) and 12 sc’s between petals
Rnd 19
Use the same yarn as you used for Round 6.
Join your yarn by making a sl st around any ch-3 space from Round 6, remembering to insert your hook between 2 of the tr’s from Round 7 (that you made into the ch-3 space). Make 6 dc’s in the next ch-6 loop from Round 6. Ch 1. “Tack the petal down by making a sl st in the sc between petals from Round 18. Ch 1 and sc into the side (top) of the last of the 6 dc’s you made into the loop. Make 6 more dc’s into the same ch-6 loop. Complete the petal by making a sc around the ch-4 from Round 6, between any 2 tr’s from Round 7
Repeat around and join as instructed.
Rnd 20
Stitch count: 12 Petals (each containing 10 hdc’s) and 12 sc’s between petals
Our Team’s Opinion About This Pattern
Flower Motif, a stylish motif with an amazing effect that will amaze you, I’m sure you’re gonna love the design of this piece and will want to use it to compose your works because of its special touch. This amazing square is very colorful and its colors can be changed if you want it, this will surely make your customers want one like it, which will help you in sales!!
Want to make this amazing Flower Motif? So it’s simple, set aside all your material and tools before starting your piece so that you already have everything close at hand, so it will be easy to carry out this project, follow the tutorial carefully, make your piece while following the tutorial and I I am sure that you will be able to make this beautiful project easily.